
티스토리 뷰
Thymeleaf
Spring에서 사용되는 템플릿 엔진으로, 사용을 위해선 Spring Boot Starter에 요소를 추가해줘야한다. Spring에선 최근 Thymeleaf를 더 선호하며 확장자가 html이기에 다른 java 프레임워크에서 가져다 쓰기 용이하다.
기본 표현식
Controller에서 Model을 통해 넘겨준 데이터를 활용하는 방법을 알아보자
controller/ThymeleafController.java
@Controller
public class ThymeleafController {

	@GetMapping("/user")
	public String user(Model model) {
		Map<String, Object> user = null;
		user = new HashMap<>();
		user.put("userId", "z");
		user.put("userName", "zoo");
		user.put("userAge", 25);
		model.addAttribute("user", user);
		return "user";
	}

}
templates/user.html
<!DOCTYPE html>
<html xmlns:th="http://www.thymeleaf.org">

<head>
	<meta charset="UTF-8">
	<title>Insert title here</title>
</head>

<body>
	아이디:<span>[[${user.userId}]]</span><br>
	이름:<span>[[${user.userName}]]</span><br>
	나이:<span>[[${user.userAge}]]</span><br>
	<hr>
	아이디:<span th:text="${user.userId}"></span><br>
	이름:<span th:text="${user.userName}"></span><br>
	나이:<span th:text="${user.userAge}"></span><br>
	<hr>
	아이디:<span data-th-text="${user.userId}"></span><br>
	이름:<span data-th-text="${user.userName}"></span><br>
	나이:<span data-th-text="${user.userAge}"></span><br>
</body>

</html>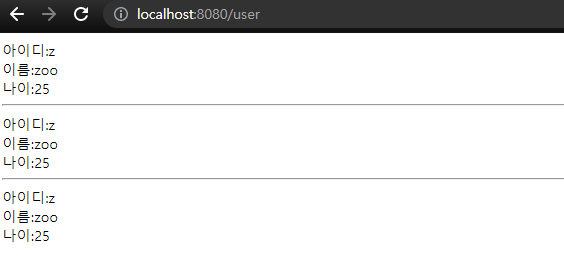
표현식 모두 같은 결과를 보여준다. 단일 데이터를 html에 표현할 땐 취향에 맞는 표현식을 정하면 된다.
th:each
복수의 요소를 반복적으로 화면에 뿌리기 위해 th:each를 이용할 수 있다.
Controller
@GetMapping("/userList")
public String userList(Model model) {
	List<Map<String, Object>> userList = new ArrayList<>();
	Map<String, Object> user = null;
	user = new HashMap<>();

	user.put("userId", "a");
	user.put("userName", "apple");
	user.put("userAge", 21);
	userList.add(user);

	user = new HashMap<>();
	user.put("userId", "b");
	user.put("userName", "banana");
	user.put("userAge", 22);
	userList.add(user);

	user = new HashMap<>();
	user.put("userId", "c");
	user.put("userName", "carrot");
	user.put("userAge", 23);
	userList.add(user);

	model.addAttribute("userList", userList);
	return "userList";
}
templates/userList.html
<body>
	<table border="1">
		<tr>
			<td>아이디</td>
			<td>이름</td>
			<td>나이</td>
		</tr>
		<tr th:each="user : ${userList}">
			<td th:text="${user.userId}"></td>
			<td th:text="${user.userName}"></td>
			<td th:text="${user.userAge}"></td>
		</tr>
	</table>
	<hr>
	<th:block th:each="pageNumber : ${#numbers.sequence(1, 10)}">
		<span th:text="${pageNumber}"></span>
	</th:block>


</body>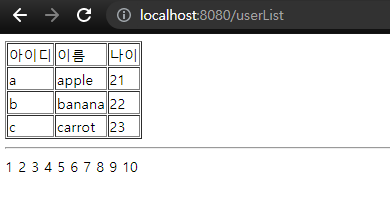
th:if
조건에 따라 다른 데이터를 출력하기 위해 사용한다. 세션이 로그인 상태일 때를 구분해서 "로그아웃", "로그인" 버튼을 보이거나 현재 페이지 표시 등, 자주 사용된다.
Controller
@GetMapping("/mode")
public String mode(Model model, @RequestParam Map<String, Object> map) {
	model.addAttribute("name", map.get("name"));
	model.addAttribute("auth", map.get("auth"));
	model.addAttribute("category", map.get("category"));
	return "mode";
}
templates/mode.html
<head>
	<meta charset="UTF-8">
	<title>thymeleaf</title>
</head>

<body>
	관리자 이름 :
	<span th:if="${name} != null" th:text="${name}"></span>
	<span th:unless="${name} != null" th:text="이름없음"></span>
	<br>
	권한 : <span th:text="${auth} != null ? ${auth} : '권한없음'"></span><br>
	담당 카테고리 :
	<span th:switch="${category}">
		<span th:case="1">커뮤니티</span>
		<span th:case="2">장터</span>
		<span th:case="3">갤러리</span>
	</span><br>
</body>

주소창으로 인자가 들어왔을 때와 그러지 않았을 때를 구분해 각기 다른 화면을 보여준다. th:if와 unless를 사용할 때 조건에 사용되는 연산자가 동일하다는 걸 주의하자. switch case또한 사용할 수 있지만 변동성이 정말 낮은 요소에 대해서만 사용해야 하므로 주의하자.
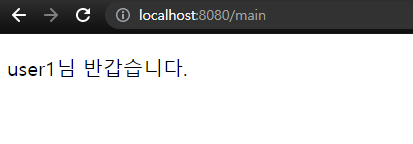
로그인 구현
HttpSession을 이용해 간단한 로그인 화면을 구현한다.
model/User.java
@Data
public class User {
	private String userId;
	private String userPw;
}
controller/homeController.java
@Controller
public class HomeController {
	@GetMapping("/login")
	public String login() {
		return "login";
	}

	@PostMapping("/login")
	public String postLogin(User user, HttpSession session) {
		session.setAttribute("user", user);
		return "redirect:/main";
	}

	@GetMapping("/main")
	public String main() {
		return "main";
	}
}
login.html
<body>
	<form action="/login" method="post">
		ID : <input type="text" name="userId"><br>
		PW : <input type="password" name="userPw"><br>
		<input type="submit" value="로그인">
	</form>
</body>

main.html
<body>
	<p th:if="${session.user} != null" th:text="${session.user.userId} + '님 반갑습니다.'"></p>
	<p th:unless="${session.user} != null">로그인되어 있지 않습니다.</p>
</body>
'Programming > Spring' 카테고리의 다른 글
| 스프링 설정파일 분리 (0) | 2022.03.12 |
|---|---|
| [스프링부트] 이클립스에 환경설정 - MariaDB 연동 (2) | 2021.08.16 |
| [스프링부트] 이클립스 환경설정 (0) | 2021.08.02 |
| [스프링부트] OPEN API 와 DB 연동하기 (0) | 2021.07.25 |
| [스프링부트] Open API (0) | 2021.07.19 |
- Total
- Today
- Yesterday
- svn
- JSP
- C
- Thymeleaf
- 프로그래머스
- 스프링부트
- 국비교육
- SQL
- 스프링
- 인턴
- 네트워크
- 오류
- 이클립스
- C++
- HeidiSQL
- 환경설정
- 백준
- CSS
- 넥사크로
- 부트스트랩
- Java
- 데이터베이스
- 오라클
- Open API
- CS
- 개발용어
- JVM
| 일 | 월 | 화 | 수 | 목 | 금 | 토 |
|---|---|---|---|---|---|---|
| 1 | 2 | 3 | 4 | |||
| 5 | 6 | 7 | 8 | 9 | 10 | 11 |
| 12 | 13 | 14 | 15 | 16 | 17 | 18 |
| 19 | 20 | 21 | 22 | 23 | 24 | 25 |
| 26 | 27 | 28 | 29 | 30 | 31 |